Lumberyard C++入門
この記事はLumberyard Advent Calendar 2017の11日目の記事です。
Lumberyard Advent Calendar 2017 - Qiita
概要
今回作るもの
C++で新規のコンポーネントを作成
コンポーネントのビルド、登録まで行います。
コンポーネントの中身は空なので、ログを出したり
更新処理や当たり判定を取ったりはまだやっていません。
環境
Lumberyard 1.10.0.0
Visual Studio Community2015
Solutionファイルの生成
新規プロジェクトを作成すると下記にソリューションファイルも生成されます。
Lumberyard\(EngineVersion)\dev\Solutions\(ProjectName)
プロジェクトの作成方法についてはこちらを参照ください。
papersloth.hatenablog.com
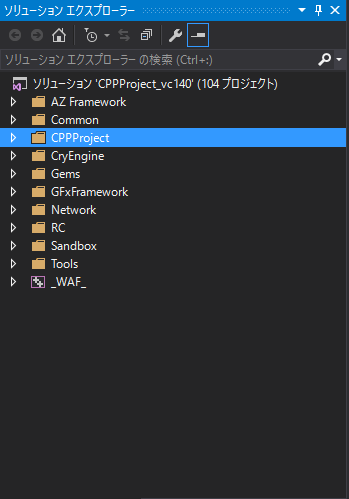
さて、ソリューションエクスプローラーを見てみると
ソリューション(ProjectName)
の下に幾つかフォルダが並んでいて、その中に自分のProject名のフォルダもありますね。
今回はCPPProjectという名前で作成しました。
ソースコードの追加
続いて、コードを追加していきましょう。
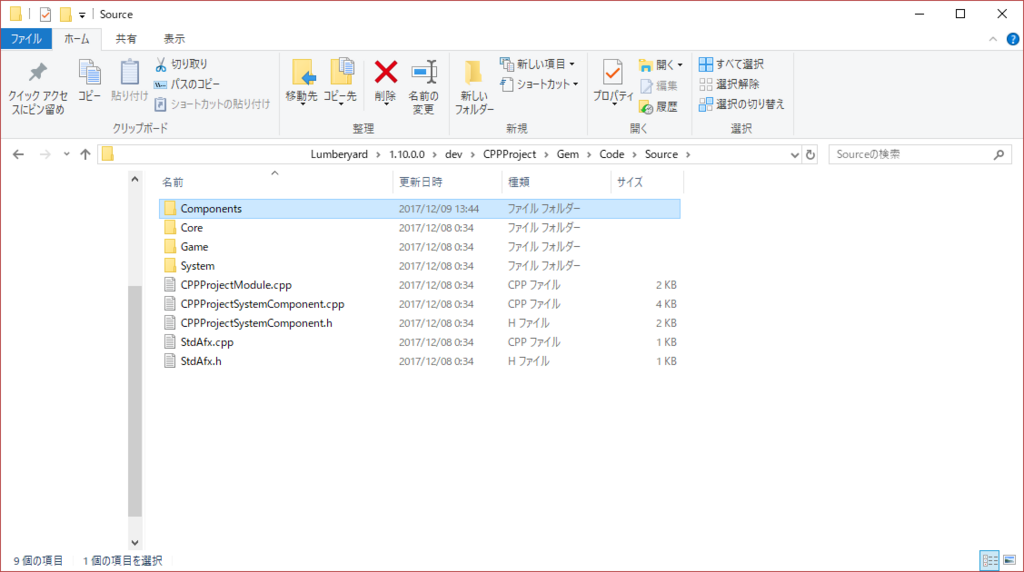
先ず、ソースコードは下記に保存されています。
Lumberyard\1.10.0.0\dev\(ProjectName)\Gem\Code\Source
今回はここにComponentsというフォルダを追加しました。
ソースコードを追加する場所はProject名のフォルダの下のProjectファイルの中です。
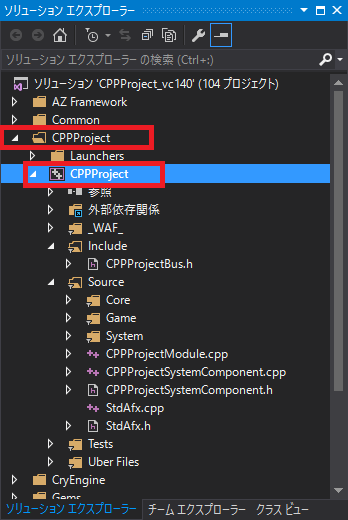
UnityやUE4だとエディターから追加すると思いますが、Lunberyardは通常のC++のソースコードの追加方法になります。
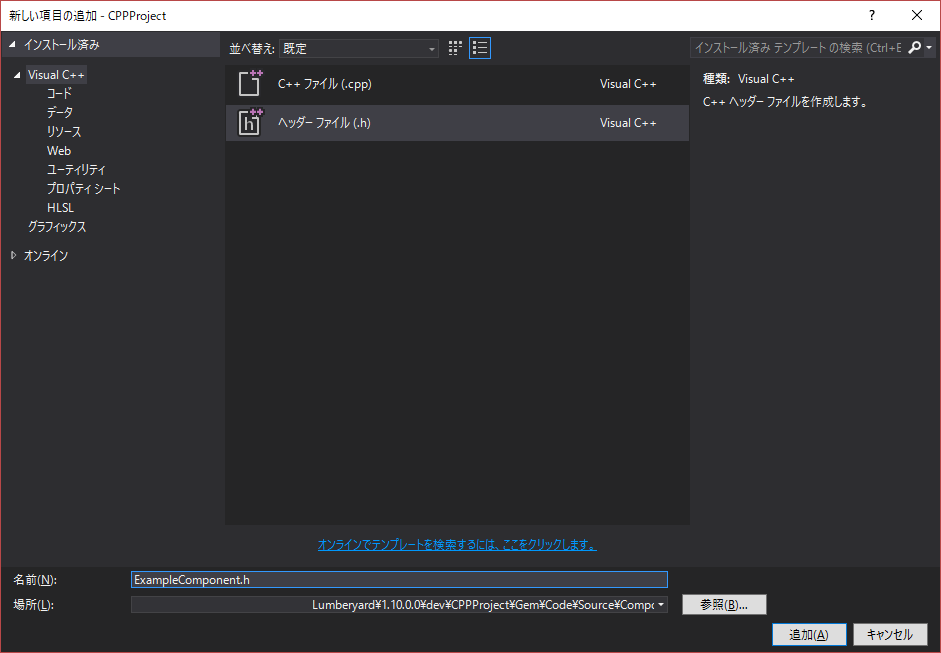
先ずはHeaderの追加
保存場所は先程追加したComponents以下を指定します。
ドキュメントを見ながらそれっぽいコードを書いていきます。
コンポーネントの作成 - Lumberyard
ExampleComponent.h
#pragma once
#include <AzCore/Component/Component.h>

namespace LYGame
{
	class ExampleComponent : public AZ::Component
	{
	public:
		AZ_COMPONENT(ExampleComponent, "{9D793D70-7616-4936-A45F-F921C4B4985A}");

		static void Reflect(AZ::ReflectContext* context);

		void Init() override;
		void Activate() override;
		void Deactivate() override;

	private:
		AZStd::string exampleProperty;
	};
}
ちょっと特殊なのが、AZ_COMPONENTの第2引数ですね。
一意の UUIDを入れる必要があるようです。
Visual Studioのツールから作成して設定しておきます。
続いてHeader同様にcppファイルも書いていきます。
ExampleComponent.cpp
#include "StdAfx.h"
#include "ExampleComponent.h"
#include <AzCore/Serialization/SerializeContext.h>
#include <AzCore/Serialization/EditContext.h>

namespace LYGame
{
	void ExampleComponent::Reflect(AZ::ReflectContext* context)
	{
		AZ::SerializeContext* const serializeContext = azrtti_cast<AZ::SerializeContext*>(context);
		if (serializeContext == nullptr)
		{
			return;
		}
		serializeContext->Class<ExampleComponent>()->Version(1)->Field("ExampleProperty", &ExampleComponent::exampleProperty);

		AZ::EditContext* const editContext = serializeContext->GetEditContext();
		if (editContext == nullptr)
		{
			return;
		}


		editContext->Class<ExampleComponent>("ExampleComponent", "Example Component Description")
			->ClassElement(AZ::Edit::ClassElements::EditorData, "")
			->Attribute(AZ::Edit::Attributes::Category, "ExampleCategoryName")
			->Attribute(AZ::Edit::Attributes::AppearsInAddComponentMenu, AZ_CRC("Game"))
			->DataElement(0, &ExampleComponent::exampleProperty, "ExampleProperty", "Example Property Description");
	}

	void ExampleComponent::Init()
	{
	}

	void ExampleComponent::Activate()
	{
	}

	void ExampleComponent::Deactivate()
	{
	}
}
Init, Activate, Deactivateは先程のドキュメントを見てもらえればわかりますが
Initだけ軽く説明をこちらにも書いておきます。
Entity(Unity:GameObject, UE4:Actor or UObject)に対して一度だけ呼び出されます。
ComponentはすぐにActiveにならないことがあるため、ここで最小限のセットアップを行います。
コンストラクタ(ctor)に近いイメージですね(Unity:Awake, UE4:ctor)
処理を長々とReflectに書きました。Reflectについてはこちら。
シリアル化と編集のためのコンポーネントのリフレクション - Lumberyard
この辺りは自分もお作法として書いてるところですので、詳しい解説はまだできそうにないです。
詳しく知りたい方はドキュメントを読んでいただければと思います。
ビルドシステムへの通知
続いて、Wafビルドシステムへの通知を行います。
Waf ビルドシステム - Lumberyard
Lumberyardのビルドシステムにコンポーネントの追加を知らせる処理を書きます。
(ProjectName).waf_filesを開き
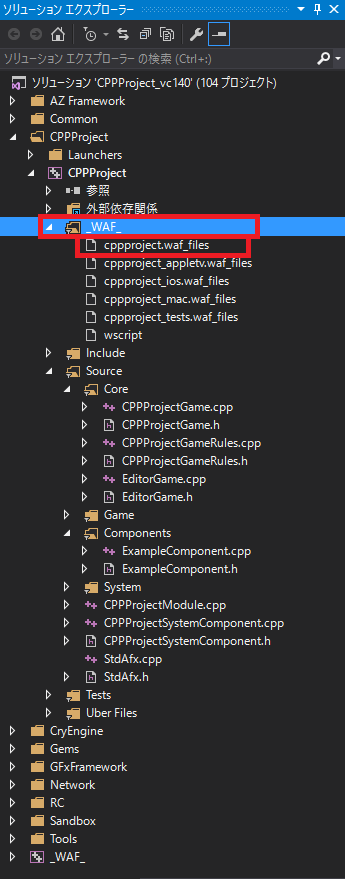
下記のように記述します。
{
    "none": {
        "Source": [
            "Source/StdAfx.cpp",
            "Source/StdAfx.h"
        ]
    },
    "auto": {
        "Include": [
            "Include/CPPProject/CPPProjectBus.h"
        ],
        "Source": [
            "Source/CPPProjectModule.cpp",
            "Source/CPPProjectSystemComponent.cpp",
            "Source/CPPProjectSystemComponent.h"
        ],
        "Source/Core": [
            "Source/Core/EditorGame.cpp",
            "Source/Core/EditorGame.h",
            "Source/Core/CPPProjectGame.cpp",
            "Source/Core/CPPProjectGame.h",
            "Source/Core/CPPProjectGameRules.cpp",
            "Source/Core/CPPProjectGameRules.h"
        ],
        // 追加部分
        "Source/Components": [
            "Source/Components/ExampleComponent.cpp",
            "Source/Components/ExampleComponent.h"
        ],
        // 追加終了
        "Source/Game": [
            "Source/Game/Actor.cpp",
            "Source/Game/Actor.h"
        ],
        "Source/System": [
            "Source/System/GameStartup.cpp",
            "Source/System/GameStartup.h"
        ]
    }
}
コンポーネントの登録
続いてコンポーネントの登録を行います。
登録するには先ず
Source\Core\(ProjectName)Game.cppを開きます。
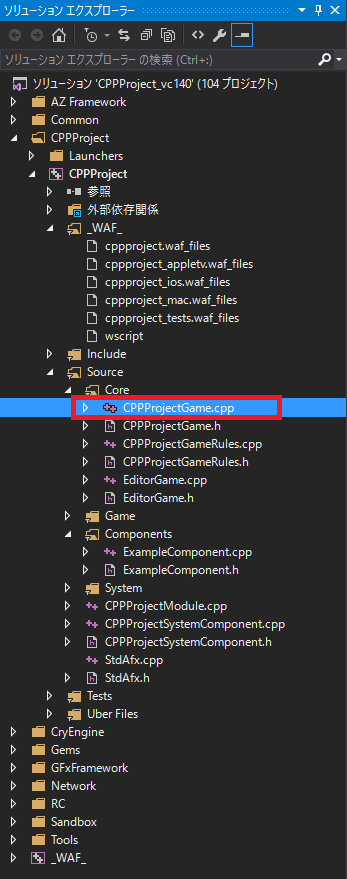
全部をまるっと載せるのかなりの行数になってしまうため、変更点だけ載せます。
includeの追加
#include <AzCore/Component/ComponentApplicationBus.h>
#include "Components/ExampleComponent.h"
CompleteInitへの追加
bool CPPProjectGame::CompleteInit()
{
    // EBUS_EVENTを追加
    EBUS_EVENT(AZ::ComponentApplicationBus, RegisterComponentDescriptor, LYGame::ExampleComponent::CreateDescriptor());
    return true;
}
動作確認
エンジンをビルドしてEditorを立ち上げます。
ソースコードからEditorを立ち上げる場合はSandbox/Editorを使用します。

Sandbox/Editorをスタートアッププロジェクトに設定し
[All] Debugで実行してみましょう。

エラーがなければ、エディターが立ち上がります。
Level, Entityの追加方法等はこちらを参考にしてみてください。
papersloth.hatenablog.com
無事にコードが反映されていればAdd Componentから"Example Component"が選択できます。
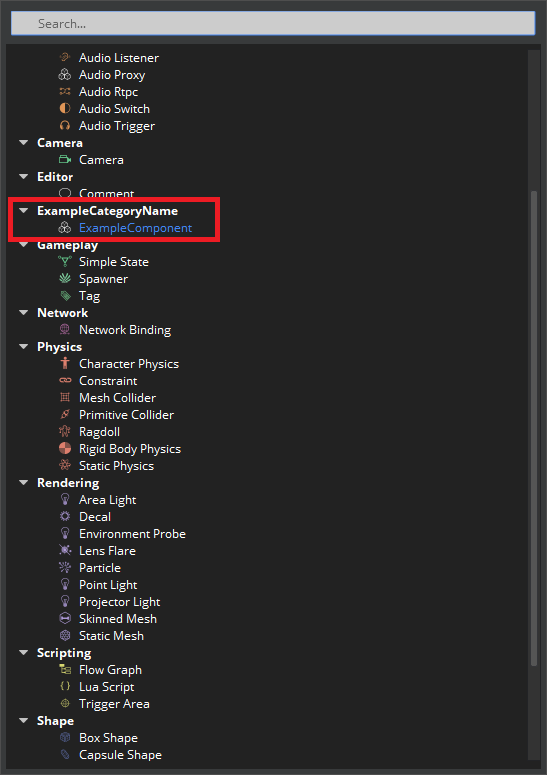
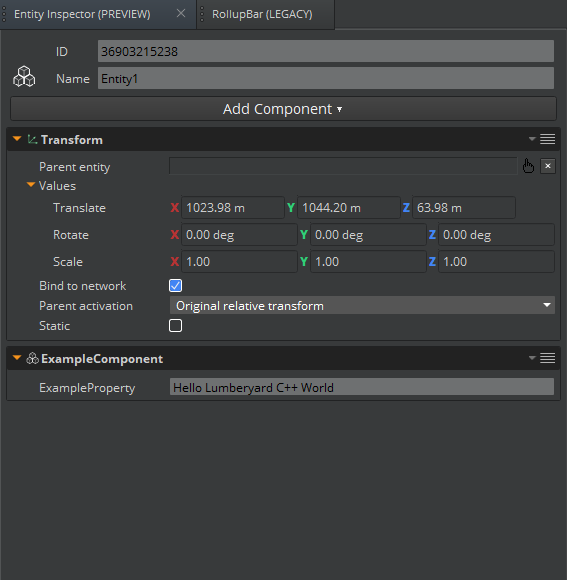
今回はここまで。以上となります。
バージョンによってはソースコードの場所やソリューションの構成まで少し変わっているところがあるようです。
ドキュメントやチュートリアルを見る時はバージョンが同じか、違っていても同じような機能かを確認しながら作成するとなんとかなりそうです。